Adding a Favicon to Your Website
Adding a favicon to your website is a great way to boost your site's visibility, professionalism, and brand recognition. A favicon, or favorite icon, is that tiny image that appears next to your website's name in a tab or bookmark list, helping users identify your site immediately. Follow these straightforward steps to customize and add a favicon to your Website Manager platform, enhancing your site's identity and user experience.
Create Your Favicon
Add New Favicon to Website Manager
Create Your Favicon
- Design an image that encapsulates your brand.
- Remember, this image will be scaled down to a very small size, so simplicity and clarity are key.
- Ensure the image is square and saved in one of the supported formats: ICO, PNG, or GIF.
- Optimal Sizes:
- 16x16 pixels: Ideal for web browsers.
- 32x32 pixels: Suitable for taskbar shortcut icons.
- 64x64 pixels: Recommended for desktop shortcut icons.
Add New Favicon to Website Manager
- Login to Website Manager
- Navigate to ‘Edit My Website’
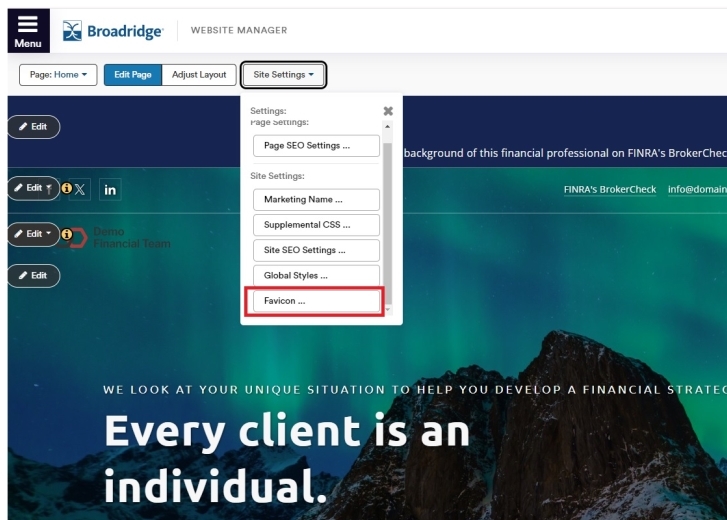
- Click ‘Site Settings’ and select the option labeled 'Favicon'
- Click 'ADD NEW' to create new content.
- You will be prompted to add the following data attributes:
- Name* - Add a name for your Favicon (for internal reference only)
- Image URL - Click ‘Select’ to select your Favicon image.
- From Manage your Images, select an Existing Image, search for the image, and click, ‘Select’.
- To add a New Image…Click the ‘New Image’ tab.
- To upload files, drag and drop the image into this area or click inside the box to open a window, search your computer for the image, and click Save.
- Note -The Favicon can only be in ICO, PNG, or GIF format and should be 16-, 32- or 64-pixels square.
- Add Alt Text for accessibility.
- Select from one of the 3 default size options.
- 16x16 pixels: Ideal for web browsers.
- 32x32 pixels: Suitable for taskbar shortcut icons.
- 64x64 pixels: Recommended for desktop shortcut icons.
- if the image is not already cropped to the one of the 3 sizes an error message will display.
- Click ‘Edit’ to resize the image.
- Adjust the image to be within the 64x64 (for this example)size and click ‘Save Changes’.
- To resize your image:
- Adjust the size using the slider to fit the yellow crop frame. Slide right to enlarge or left to reduce.
- To move the image, drag within the yellow crop frame or use the arrow icons in "Move Image" to adjust.
- Choose the focal point of the image that will be used to determine how it should be cropped for mobile devices. You can do this by dragging the yellow focal point icon or entering specific values in the "Focal Point Position" box.
- Click ‘Add to Library’.
- Toggle the favicon content to ‘On’ and click ‘Save’.
- To preview the new Favicon, go to PREVIEW and click ‘Desktop’.
- When viewing the site in presenter mode or live the new Favicon shall be displayed.
